 TechOceanhub
TechOceanhub
TechOceanhub
As people say Recycler view is difficult to understand but it is very flexible in nature as it provides dynamic features as compared to the ListView and Custom Adapter or you can say it is a combination of listview and custom adapter.
RecyclerView uses a ViewHolder class which is a helper class that holds the View of a row or rows, and we need to add the RecyclerView support library com.android.support:recyclerview-v7:23.1.0 or above.
Now we can understand why it’s called a RecyclerView because it recycles the existing view for a new one and gives much more power and control to its developers.
Below is a simple example of a recyclerview.
Recycler view provides different components to work together to display your data. It creates a new ViewHolder object to inflate the layout and hold those references, or it recycles one from the existing stack(views).
Overall, the RecyclerView class supports the display of a collection of data.
First add below libraries in order to implement my recyclerView you can put them in build.gradle(Module:app)
dependencies {
    implementation fileTree(dir: 'libs', include: ['*.jar'])
    implementation "org.jetbrains.kotlin:kotlin-stdlib-jdk7:$kotlin_version"
    implementation 'androidx.appcompat:appcompat:1.2.0'
    implementation 'androidx.core:core-ktx:1.3.1'
    implementation 'androidx.constraintlayout:constraintlayout:2.0.1'
    testImplementation 'junit:junit:4.12'
    androidTestImplementation 'androidx.test.ext:junit:1.1.2'
    androidTestImplementation 'androidx.test.espresso:espresso-core:3.3.0'
    implementation 'androidx.recyclerview:recyclerview:1.1.0'
    implementation 'androidx.cardview:cardview:1.0.0'
}
You can make RecyclerView with or Without cardView,
I have added in order to make my RecyclerView look more professional.
In second step just go inside res and click layout folder and edit your activity_main.xml and find the code similar to below:
<?xml version="1.0" encoding="utf-8"?>
<LinearLayout xmlns:android="http://schemas.android.com/apk/res/android"
    xmlns:tools="http://schemas.android.com/tools"
    android:layout_width="match_parent"
    android:layout_height="wrap_content"
    xmlns:app="http://schemas.android.com/apk/res-auto"
    tools:context=".MainActivity">

    <androidx.recyclerview.widget.RecyclerView
        android:layout_height="wrap_content"
        android:layout_width="match_parent"
        android:id="@+id/imagesRecyclerView"/>

</LinearLayout>
In third step add one more xml file and name langimage.xml and write below code.
<?xml version="1.0" encoding="utf-8"?>
<androidx.cardview.widget.CardView
    xmlns:card_view="http://schemas.android.com/apk/res-auto"
    xmlns:android="http://schemas.android.com/apk/res/android"
    android:id="@+id/card_view"
    android:layout_width="match_parent"
    android:layout_height="wrap_content"
    android:layout_margin="10dp"
    card_view:cardCornerRadius="50dp"
    card_view:cardBackgroundColor="#fed8b1">

        <ImageView
            android:layout_width="120dp"
            android:layout_height="150dp"
            android:id="@+id/image"
            android:layout_marginLeft="110dp" />

</androidx.cardview.widget.CardView>
Now create a data class in kotlin named Language.
package adapter.manasvi.com.recyclerexampleproject
data class Language(
    val imageSrc : Int
)
Next step will be to make an adapter which will help as in between file to help the user to view data row by row and name it languageAdapter.kt.
package adapter.manasvi.com.recyclerexampleproject

import android.content.Context
import android.view.LayoutInflater
import android.view.View
import android.view.ViewGroup
import android.widget.ImageView
import android.widget.TextView
import androidx.recyclerview.widget.RecyclerView

class languageAdapter(private val context : Context, private val images : List <Language>)
    : RecyclerView.Adapter<languageAdapter.LanguageViewHolder>(){


    class LanguageViewHolder(view: View) : RecyclerView.ViewHolder(view){
        val img = itemView.findViewById<ImageView>(R.id.image)
        fun bindView(image: Language) {
            img.setImageResource(image.imageSrc)
            //imgTitle.text = image.title
        }
    }

    override fun onCreateViewHolder(parent: ViewGroup, viewType: Int) :LanguageViewHolder {
      return(LanguageViewHolder(LayoutInflater.from(context).inflate(R.layout.langimage, parent, false)))

    }

    override fun getItemCount(): Int {
        return images.size
    }

    override fun onBindViewHolder(holder: LanguageViewHolder, position: Int) {
        holder.bindView(images[position])
    }
}
Last step will be to modify MainActivity.kt and run it.
package adapter.manasvi.com.recyclerexampleproject

import androidx.appcompat.app.AppCompatActivity
import android.os.Bundle
import androidx.recyclerview.widget.LinearLayoutManager
import androidx.recyclerview.widget.RecyclerView
import kotlinx.android.synthetic.main.activity_main.*

class MainActivity : AppCompatActivity() {

    override fun onCreate(savedInstanceState: Bundle?) {
        super.onCreate(savedInstanceState)
        setContentView(R.layout.activity_main)

        val images = listOf<Language>(
            Language(R.drawable.clang),
            Language(R.drawable.cplus),
            Language(R.drawable.net),
            Language( R.drawable.java),
            Language(R.drawable.php)

        )

        val recyclerView = findViewById<RecyclerView>(R.id.imagesRecyclerView)
        recyclerView.layoutManager = LinearLayoutManager(this)
        recyclerView.setHasFixedSize(true)
        recyclerView.adapter = languageAdapter(this, images)
    }
}
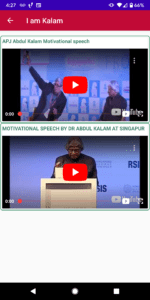
Now lets see the output .

Do try this example and modify it and feel free to comment.
Sample Code:-
Copyright ©TechOceanhub All Rights Reserved.